
What does summer taste like? I’d argue it tastes something like this pie: bright and vibrant and bursting with fresh peach flavor, perfumed with vanilla bean, and encased in a buttery, flaky pastry crust. If that’s not summer in a pie crust, I don’t know what is.
Fresh vanilla bean is the secret to making this pie extra special, in the form of a freckled vanilla sugar that’s used in 3 different places: the fresh peach filling, generously sprinkled on top of the crust, and mixed in to the freshly whipped cream as a finishing touch (the icing on the pie, if you will.)
For a fruit pie to knock my socks off, it really has to be something special. I’m talking about eyes-rolling-back-in-your-head level good. And that’s a characteristic I rarely ascribe to warm fruit. I typically prefer more robust, chocolate-filled desserts to a fruit one, but this peach pie—with its balanced sweetness and visible vanilla bean freckles—has my full attention.
Even Taylor admitted it was passable (high praise from the man who claims a mediocre cake is preferable to a good pie).
The whole thing is bursting with bright and vibrant peach flavor and nestled in a buttery, flaky crust, and topped with a generous dollop of freshly whipped vanilla bean whipped cream for good measure (vanilla bean ice cream would also be acceptable).
The distinguishing feature of this peach pie, however, is the vanilla sugar, which gets incorporated into every component of this pie (filling, crust, and whipped cream on top). It’s what takes this pie from ordinary to the best peach pie—scratch that, best, any kind of pie—I’ve ever had. And that’s not hyperbole, it’s the gosh darn truth.
Peaches might just be the best summer fruit, in my opinion. When you get a good one, that is (a bad peach is just sad). And this summer happens to be particularly good. A few weeks ago I sliced into a peach that may have well been a plum for how red and juicy it was inside. I swear it was the best peach I’ve ever had… juicy and bright with just the right amount of sweetness and acidity. Perfection. The last bag wasn’t quite as stunning color-wise, though they still had a lovely blush to them which you can see in the photos… I swear there’s only peaches in there, no cherries or berries or anything else to give them that color.
I first made this pie 15 years ago back in 2010, after a particularly fruitful day picking peaches at a local farm. I think we picked 13 pounds of peaches in all, and spent the entire weekend using them up in everything from peach jam to peach gazpacho (complete a peach pit surprise!) Alas, the farm had to rip out their peach trees the following year, and I’ve yet to find a new pick-your-own orchard less than a 2-hour drive away.
I know Georgia peaches get the most attention. And I’m sure our parents would argue on behalf of the Palisade peaches in Colorado. But I have to put in a good word for Tennessee peaches – which might just be the most delicious peaches we’ve ever eaten.
Since we can no longer pick our own, I have to settle for what I can find at the farmers market, but I will intentionally seek out Tennessee grown peaches whenever I can find them. Maybe it’s solely because they had less distance to travel, but I swear they just taste better.
The beauty of this peach pie—beyond the vibrant flavor and charming vanilla bean freckles that is—is just how easy it is to make. There’s no need to pre-cook the fruit or fruit liquid as in some recipes, rather, just toss the peaches with a mixture of sugar and cornstarch, dump it in the crust, and you’re good to go. Well, there’s a bit more involved than that with the crust and vanilla sugar and scratch-made whipped cream and all that, but it’s still wildly easy compared to many fruit pie recipes out there.
The vanilla bean elevates the whole thing, complimenting the natural sweetness of the peaches and making for a satisfying and indulgent dessert, just as deserving as any chocolate cake.
Peeling peaches might seem like a tedious task, but trust me that you don’t want peach skins mucking up the texture of your pie.
To easily peel peaches, cut a shallow X-shaped slit in the bottom of each peach, then submerge in boiling water for 30 to 40 seconds. Remove with a slotted spoon and immediately transfer to an ice bath to stop the cooking process.
Once the peaches are cool enough to handle, you should be able to very easily peel the skins right off.
Pro tip: this same trick works with tomatoes too!
Once peeled, halve the peaches, discard the pits, then cut into wedges. Please (PLEASE!) be careful slicing the peaches as they are surprisingly slippery.
Once your peaches are peeled and sliced, the filling comes together in minutes, no extra cooking involved—just toss the peaches with some of the vanilla sugar mixed with cornstarch. Dump that into your unbaked pie crust, dot the top with butter, and then add the top crust.
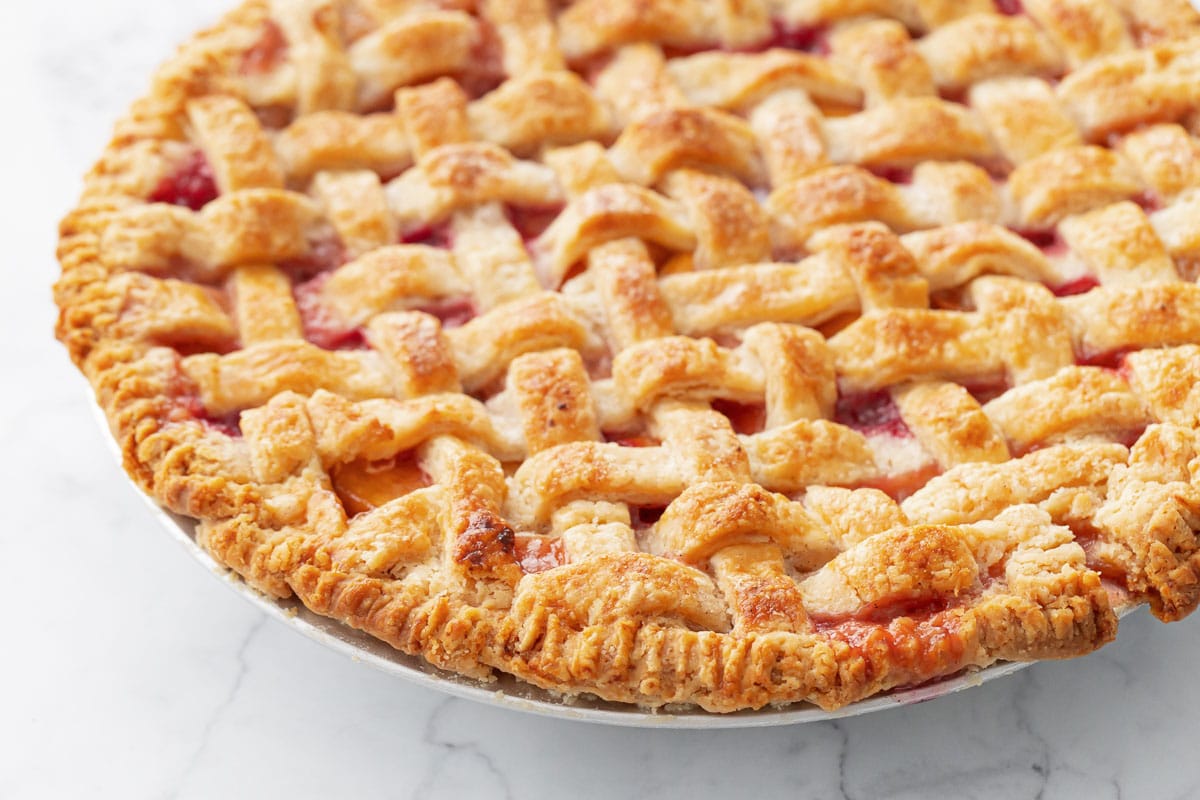
When I originally posted this recipe in 2010, it was my first ever double crusted pie. And despite the wonky edges, I definitely considered it a success. Here we are 15 years later and… pie crust is still something I’ve yet to fully master. I clearly still need to work on my crimping technique (I needed about another 1/2-inch of crust on the bottom to be able to fold it over the lattice and get a nice crimp; instead I just mashed it with a fork which worked to adhere the top and bottom together but isn’t exactly the prettiest).
Pie crust is, as a general rule, a pain to work with. In fact, if your pie dough doesn’t feel like a complete disaster, it’s probably going to bake up tough and hard. Such is the nature of pie crust. But I will say that this particular crust is more manageable than most due to the combo of butter and shortening.
Could you use all butter? Sure. You’ll need 2 sticks worth of cold butter. It’ll taste great, but might seem a bit crumblier when rolling it out; just stick it out and it’ll work itself out in the end. I’m rooting for you!
A word of warning – DON’T skip the step where it tells you to put a baking sheet underneath your pie. Because ruining a cheap sheet pan is always preferable to having to chip away at a hardened mass of caramelized sugar and fruit off the bottom of your oven.
I didn’t show step-by-steps for making the lattice top here, as that was a last minute decision on my part. The original recipe featured a solid top crust with just a few vents cut into the top, which you can certainly do too and save yourself some hassle for sure.
If you do want to do a lattice, however, you can pre-assemble the lattice on a flat surface as I did (use waxed or parchment paper so it’s easily maneuvered) and then chill it until you’re ready to use it. Chilling will firm up the whole thing, so you can pretty easily slide it right on top of your pie!
Or, you can assemble the lattice on top of the filled pie, which is definitely the more traditional method (see my tart cherry pie for some process photos showing this step). Just work fast so your crust stays as cool as possible.
I fully admit that lattice crusts are kind of a pain. They look pretty, sure, but they take more time to make, AND are a pain to cut into after baking. Much more so than a solid top. Someone remind me that next time I try to attempt one. In fact, next time I make this particular pie (which I will because it’s just that good), I’d definitely skip the lattice, and maybe just cut a few decorative shapes into the top crust instead of just plain slits for vents.
In hindsight, both my bottom crust and my lattice were about 1/2 inch too small, which made sealing and finishing the edges a bit tricky. I ended up just mashing them together with a fork, which ultimately worked, though certainly not the prettiest.
You’d think after 15 years and dozens of pies I’d have mastered pie crust… but alas… that is not the case.
Still, even with the ugly edges, this pie takes the cake. Er, wait. I’m mixing up my food puns here. You know what I mean.
Ingredient Notes & Substitutions
Shortening: use unflavored vegetable shortening. You can replace this with more butter (so you’d need 2 sticks for the whole crust), just know the crust will be a bit harder to work with.
Vanilla bean: a whole, plump vanilla bean is the secret to this fabulous pie. Since it is mixed in with the granulated sugar, you really can’t substitute extract or paste in this case (that sugar gets sprinkled over the pie crust, for example).
Peaches: use fresh, just ripe peaches (too ripe and they’ll be soft and mushy and won’t hold up as well in the oven). I haven’t personally made it with frozen peaches, but technically they could work; though may result in a slightly soggy bottom because of the excess moisture they’ll release (so maybe let them thaw and drain off the excess liquid?)
Note that this recipe was originally published in 2010. I’ve rephotographed and republished it here, with very minimal changes. Really the only thing different I did was give it a lattice top (because I’m a glutton for punishment, apparently), and brush the top with an egg wash before baking (the original has you bake the crust without a wash, then sprinkle the 1/4 cup vanilla sugar on top immediately when the pie comes out of the oven).
Vanilla Bean Peach Pie
Fresh vanilla bean is the secret to making this pie extra special, in the form of a freckled vanilla sugar that’s used in 3 different places: the fresh peach filling, generously sprinkled on top of the crust, and mixed in to the freshly whipped cream as a finishing touch (the icing on the pie, if you will.)
-
To prepare crust, whisk together the flour, sugar and salt in a large bowl. Scatter the butter and shortening over the dry ingredients, and cut in with a pastry cutter until the large clumps of the butter are broken up. Drizzle half of the water over the flour mixture and lightly mix with a fork, until the dough starts to form clumps. Squeeze some of the pastry between your fingers. If it seems a little dry, work in another teaspoon of water at a time until the appropriate texture is achieved. (Alternatively, this can be done in a food processor by pulsing a few times to combine.)
-
Using your hands, form the pastry into two balls – one slightly larger for the bottom crust. Knead each ball once or twice on a floured work surface, then flatten the balls into 3/4-inch-thick disks. Wrap the disks in plastic, and refrigerate for at least an hour or overnight before rolling.
-
On a sheet of lightly floured wax paper, roll the larger portion of the pastry into a 12-inch circle with a floured rolling pin. Carefully transfer to a 9-inch standard pie pan. Gently tuck the pastry into the pan, without stretching it, and let the overhang drape over the edge. Place in the refrigerator for at least 15 minutes.
-
Preheat the oven to 400 degrees F.
-
To make vanilla sugar, first split the vanilla bean lengthwise. Scrape the seeds out of the bean and place in a food processor along with sugar. Pulse until no large clumps of the vanilla bean remain. Transfer 1/2 cup of the sugar to a small bowl, and whisk with the cornstarch. Set the remaining 1/2 cup sugar aside (this will be used on the top crust and in the whipped cream).
-
For pie filling, first peel peaches by brining a pot of water to a boil. Cut a shallow X through the skin of the bottom of each peach, then submerge in boiling water for 30-45 seconds. Use a slotted spoon to transfer to an ice bath to stop the cooking. Once cool enough to handle, the skins should peel off easily. Cut each peeled peach in half (be very careful doing this as peaches will be very slippery!) then remove pits and cut into wedges, about 6 wedges per half.
-
Transfer peaches to a large mixing bowl along with lemon juice. Sprinkle half of sugar/cornstarch mixture, then gently fold to evenly coat, then add the rest, folding until peaches are evenly coated and no streaks of dry cornstarch remain.
-
On a lightly floured surface or on a sheet of floured waxed paper, roll the other half of the pastry into a 10-inch circle with a floured rolling pin. Leave this whole or, if you want to make a lattice crust, slice the round into strips. You can preassemble the lattice on the waxed paper, or put it together right on top of the pie, whichever you prefer.
-
Pour the peaches into the chilled pie shell along with all juices that may have collected in the bowl, and smooth down the top with a spatula or spoon. Sprinkle butter cubes over the top of the fruit.
-
Lightly brush the rim of the pie shell with beaten egg. Invert the top pastry over the filling, and press the top and bottom pastries together to adhere, folding the bottom crust over the edge of the top crust if you have enough overhang. Crimp edges as desired. If using a solid crust rather than a lattice, cut several steam vents in the pie with a fork or paring knife.
-
Brush egg wash over the entire top crust, then sprinkle with 2-3 tablespoons of vanilla sugar (you might not need it all).
-
Place pie on a baking sheet (don’t skip this part or you’re in for a big mess) and bake at 400 degrees F for 30 minutes. Reduce the oven temperature to 375 degrees F, and rotate the pie to ensure even cooking. Continue to bake until the top is a deep golden brown and the juices visible through the vents bubble thickly, about 30 minutes more.
-
Transfer the pie to a wire rack. Let it cool for at least 2 hours, then refrigerate until ready to serve.
-
Just before serving, whip the cream with an electric mixer until it holds soft peaks. Once the cream starts to hold tracks, then add the remaining 1/4 cup vanilla sugar, 1 tablespoon at a time, and beat until cream holds medium soft peaks. Serve a large dollop of whipped cream with each slice of pie.
- You can use all butter in the crust if you like, but I think shortening makes the crust easier to work with, and more tender in the end.
- If you need to make your whipped cream ahead of time, you can stabilize it by mixing in 1/8 teaspoon of guar gum in with the sugar before adding it to the cream. Stabilized whipped cream will hold its shape better and longer than non-stabilized whipped cream, especially at warmer temperatures.
All images and text © for Love & Olive Oil.
There may be affiliate links in this post. We are a participant in the Amazon Services LLC Associates Program, an affiliate advertising program designed to provide a means for us to earn fees by linking to Amazon.com and affiliated sites.